- GPT Hacks
- Posts
- How to create your own GPT 🤖
How to create your own GPT 🤖
Step by step guide to creating and publishing a custom GPT
Hussein Yahfoufi
November 09, 2023
Hey — It’s Hussein 👋
In 2007, Steve Jobs introduced the iPhone to the world - and everything changed. From that moment on, Apple Keynote events became the biggest tech events to look forward to. Their only rival was Google I/O.
Fast forward to 2023, and tech keynote events have lost their importance and wow factor until this week when Sam Altman, CEO of OpenAI, took the stage at the very first OpenAI Dev Day and introduced a flurry of new products and updates, including GPTs, the GPT Builder and the GPT Store.
This moment will go down in history as a when everything changed moment, just like when ChatGPT was first released in November 2022 and the iPhone back in 2007.
Today, I am going to do a walkthrough of the GPT Builder and share a step-by-step guide to creating a new GPT. I’ll also summarize the key announcements made by OpenAI at Dev Day.
Let’s get into it.
Before we begin… a big thank you to:

AI to help you create social media and PPC ads in seconds
Try AdCreative.ai - used by Amazon, Microsoft, Adidas and others
50% off Black Friday deal is going on right now
What are GPTs?

Introducing GPTs
There are two ways to think about GPTs:
1- Apps
Think of GPTs as a way to create an app for ChatGPT, just like an app for iOS or Android.
For example, if you currently have an app that lets users track their calories. You can create a GPT, say CalorieGPT, and have it connect to your product so that users can open CalorieGPT from within ChatGPT and interact with it to help track calories in your app or ask questions based on ChatGPT vast knowledge.
They could also send an image of their meal to ChatGPT, ChatGPT can analyze the image, count the calories, and track them in the app for the user.
2- Custom ChatGPT
Another way to think of GPTs is creating a custom version of ChatGPT trained to answer questions in a certain way and using additional materials that you upload to it as training materials.
I created an example of this while getting ready for this article called LogoGPT - in about 5 minutes! I used content I already had on GPT Hacks on how to think about logo creation, uploaded that as knowledge to GPT Builder, answered a few questions, and voila! LogoGPT was ready to go. Here are a few example logos I was able to create using my new GPT.

Logos by LogoGPT
How do I create a GPT?
It’s much simpler than you think! Here’s a step by step example of us creating a new GPT called Business Blueprint GPT.
I recently wrote a two-part series on how to use ChatGPT to analyze a business and create a business plan (business analysis and strategic planning, tactical and operational planning).
I am going to use GPT Builder to create a new GPT and use the content from those articles as training for the new bot.
Here’s how.
1. Open GPT Builder
If you have access, you’ll see a new Explore link in your sidebar. Click on it, then click on Create a GPT.

GPTs Menu
Note: access to the GPT Builder is only available to ChatGPT Plus users ($20/month) and is being rolled out in batches.
You’ll see a split screen. On the left is the builder, and on the right is your new GPT being created.
2. Describe your GPT
GPT Builder will ask you what you want to build. For our example, I used:
A GPT that gives feedback on business ideas and works with the user to create a business plan for them.

Describe your GPT
As soon as you describe your GPT, you’ll start seeing your GPT being developed on the right side.
3. Name your GPT
Up next, GPT Builder will propose a name. They are usually decent names, but I decided to change the name, which I told GPT Builder to modify it to Business Blueprint GPT.
You can also ask it to brainstorm additional names until you are happy with the results.

Name your GPT
4. Create a logo
Next, GPT will automatically generate a logo for you using its integration with DALL·E 3. Again, here you can either accept the logo or reject it. The first logo it gave me felt too generic, so I asked for a revision.

Create a logo for your GPT
✨ Pro Tip: once you have a logo you like, save a copy of the image. There seems to be a bug right now that causes the GPT to lose the logo and there is no way to get it back unless you saved it.
5. Fine-tune (tweak) your GPT
With the basics done, GPT Builder will then ask you if you want to tweak or fine-tune your GPT. Here, you can specify a few things:
Similar to what we did with setting custom instructions in our accounts, you can provide instructions to GPT Builder on how to respond to users.
You can also specify style and tone or anything else you would like your GPT to use.
For this demo, I skipped to Step 6 first and then came back to this step. I’ll explain why in the next steps.

Fine-tune your GPT
Your GPT is fully usable from this step. But you can go further to make it even more powerful. Everything below is optional.
6. Increase GPT’s knowledge
What will set your GPT apart from others is the unique content you add to its knowledge. You do this by heading to the Configure tab and uploading the documents you want to train your GPT on.
I exported the two business analysis articles I mentioned earlier and uploaded them.

Increase GPT’s knowledge
7. Specify how your knowledge should be used
If the knowledge you submitted is reference materials to potential questions, you don’t need this step. In my case, I wanted to make sure that Business Blueprint GPT uses the document I uploaded as a step-by-step guide. After uploading the document, I went back to the builder and gave this prompt:
Use the knowledge I uploaded to help founders with their business ideas. Make sure not to overwhelm them with questions. Go through each step at a time instead of going through multiple at once. Guide them through the process slowly. Each step should build on the knowledge you've gained from the previous step. At the end of it, help them generate a PDF of their business plan using advanced data analysis (code interpreter).
8. Connect to an API (advanced)
Finally, you can connect your GPT to an API to specify actions or give it access to more data.
Remember the calorie-counting app I mentioned at the beginning of this article? This is the area that would allow you to connect your GPT to the user’s data and help them add calories to their trackers.

9. Review the configure tab
Everything we have done so far can also be manually configured by going to the Configure tab of GPT Builder.
Here you can change the name, logo, prompt, and even the conversation starters.
You can also turn on or off additional capabilities like Web Browsing, DALL·E 3, and Code Interpreter.
Before publishing your GPT, take a look at this tab and feel free to update your GPT.
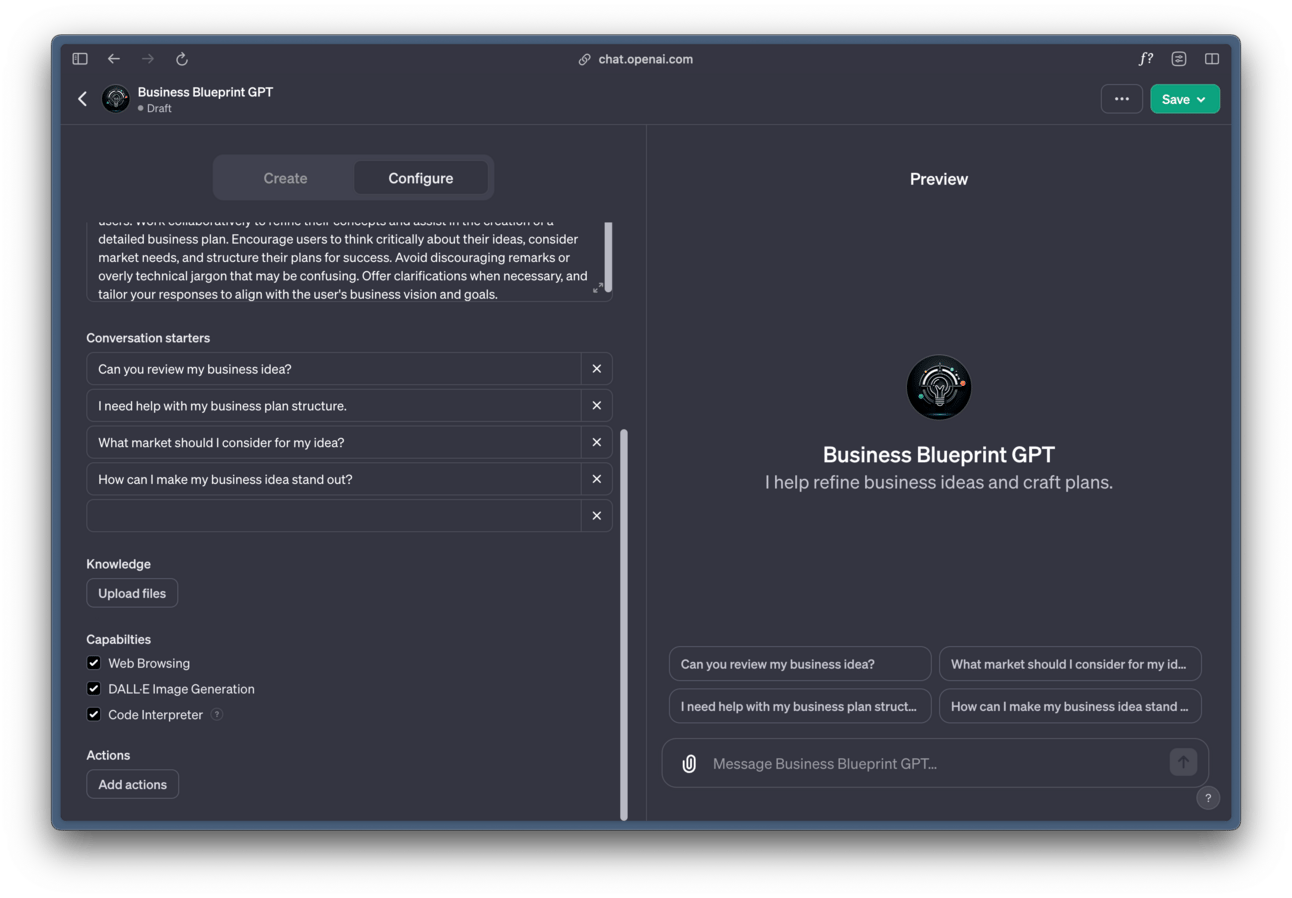
GPT configure tab
✨ Pro Tip: there is no version history in GPT Builder and everything you tell the builder will impact what is in your configuration. Make sure to save copies of what is in here in case you accidentally make changes and need to revert back
10. Publish your app!
Finally, on the top right corner of the screen, click on Save to save and publish your GPT. You have three visibility options for your new GPT. This setting can be changed at any time in the future.

Publish GPT
What is the GPT Builder?
GPT Builder is a new tool launched by OpenAI to help you easily create custom GPTs.
Where is the GPT Store?
The GPT Store is not out yet. You can explore GPTs created by OpenAI for now. I presume they are waiting a couple of weeks to see what other GPTs are created to curate them and publish them to the store.
I’ll keep an eye out and let you know when it’s out. I fully expect a gold rush to happen once the store is out, so start thinking about what GPTs you can create!
What did OpenAI announce this week?
Before we wrap for today, here’s what else OpenAI announced this week. Remember that this was a developer conference, so most of these are technical updates.
First, the non-technical updates that apply to all:
ChatGPT Plus users no longer need to switch between GPTs to access DALL·E 3, Plugins, Web Browsing or Advanced Data Analysis.
GPTs and the GPT Store.
Create your own GPT.
For the developers:
GPT-4 Turbo model available in the API. This only matters if you are developing against the OpenAI API. It’s faster and cheaper than GPT-4. They also cut the cost of GPT-3.5 Turbo.
Introduced a New Assistances API, which makes it ridiculously easy to create your own AI Assistant for your apps and websites.
APIs now have access to vision, image creation (via DALL·E 3) and text-to-speech (TTS). I’ve been writing about these features coming soon for a while and can’t wait to see what gets built with these features. Opportunities are endless.
Function calling got a boost and can now support multiple functions at a time.
One I am super excited about JSON model to get JSON responses from chat completion.
Ability to use a seed to reproduce outputs.
GPT-4 fine-tuning is now available for a beta group.
Copyright Shield: if you get sued for copyright issues from using OpenAI APIs, OpenAI will pay your legal bills.
Updated billing dashboard, which makes it easier to see how much you are spending on OpenAI APIs and on what.
This is a magical time to be thinking, building, and working in tech and AI. Let’s do a roundup of GPT Hacks readers GPTs. Build your GPTs and email or tag me on socials if you announce them there.
See you next week — Hussein ✌️
P.S. If you’d like to sponsor, reply. 5.6k founders and entrepreneurs are waiting for you.
P.P.S If you live in or visit San Diego, sign up here to be notified of tech and founder mixers I organize in the area. Would love to meet you there.
Enjoy the newsletter? Please forward this to a friend. It only takes 10 seconds. Writing this one took over 10,000 seconds. (Want rewards? 🎁 Use your custom link).
New around here? Join the newsletter (it's free).
How did you like today's newsletter? |
Join the conversation